Containers
created: 18 January 2021
modified: 04 November 2022
revision: 6
Other useful information
- auto-containerization - google jib
- Kaniko - image builder
- kubectl - tree plugin
- k8s patterns book sources
- https://learnk8s.io/production-best-practices
- https://learnk8s.io/research
- https://learnk8s.io/terraform-eks
- argo
- jaeger
- loki
- kops
- network policies editor cilium
- https://github.com/stacksimplify/aws-eks-kubernetes-masterclass
- https://www.stacksimplify.com/aws-eks/
- https://github.com/aws/eks-charts
- NGINX Location Tester
- CURL Impersonate
DOCKER
# run myTomcat image in bridge network
> docker run -it --net=bridge myTomcat
# run myPostgreSQL in the same network as myTomcat
> docker run -it --net=container:myTomcat myPostgreSQL

> sudo systemctl start docker.service ## <-- Start docker ##
> sudo systemctl stop docker.service ## <-- Stop docker ##
> sudo systemctl restart docker.service ## <-- Restart docker ##
> sudo systemctl status docker.service ## <-- Get status of docker ##

# insipred by https://btburnett.com/2017/03/remove-untagged-images-from-docker-for-windows.html
> docker ps -a -q | % { docker rm $_ } ## remove all stopped containers on windows
> docker images | ConvertFrom-String | where {$_.P2 -eq "<none>"} | % { docker rmi $_.P3 } # remove untagged images on windows
- (Burns et al., 2019)
- Unlike
CMD, theRUNinstruction is actually used to build the image, by creating a new layer on top of the previous one which is committed. - The
ENTRYPOINTspecifies a command that will always be executed when the container starts. The CMD, on the other hand, specifies the arguments that will be fed to theENTRYPOINT. Docker has a defaultENTRYPOINTwhich is/bin/sh -cbut does not have a defaultCMD. - Unlike the
CMDparameters, theENTRYPOINTcommand and parameters are not ignored when a Docker container runs with command-line parameters. - If there are more than one
CMDinstruction in a Dockerfile, only the last one will take effect. EXPOSEcommand followed by a port number allow incoming traffic to the container- The fundamental difference between
VOLUMEand-vis this:-vwill mount existing files from your operating system inside your Docker container andVOLUMEwill create a new, empty volume on your host and mount it inside your container. - !! Each
LABELinstruction creates a new layer. If your image has many labels, use the multiple form of the singleLABELinstruction.
HELM
- templates and package management tool
K8S
- (Dinesh, 2018)
- (Gupta, 2017)
- (“Oracle Linux Container Services for Use with Kubernetes User’s Guide,” n.d.)
- K8S is dropping Docker for containerD, which is the Container Runtime used in Dokcer that is now extracted as a separate component. AWS, GoogleCloud are already using it in their managed K8S clusters.
- Alternative container runtime is Cri-o, used by OpenShift.
on Ubuntu
> sudo apt-get update && sudo apt-get install -y apt-transport-https
> curl -s https://packages.cloud.google.com/apt/doc/apt-key.gpg | sudo apt-key add -
> echo "deb https://apt.kubernetes.io/ kubernetes-xenial main" | sudo tee -a /etc/apt/sources.list.d/kubernetes.list
> sudo apt-get update
> sudo apt-get install -y kubectl
> sudo apt-get install -y kubeadm kubelet
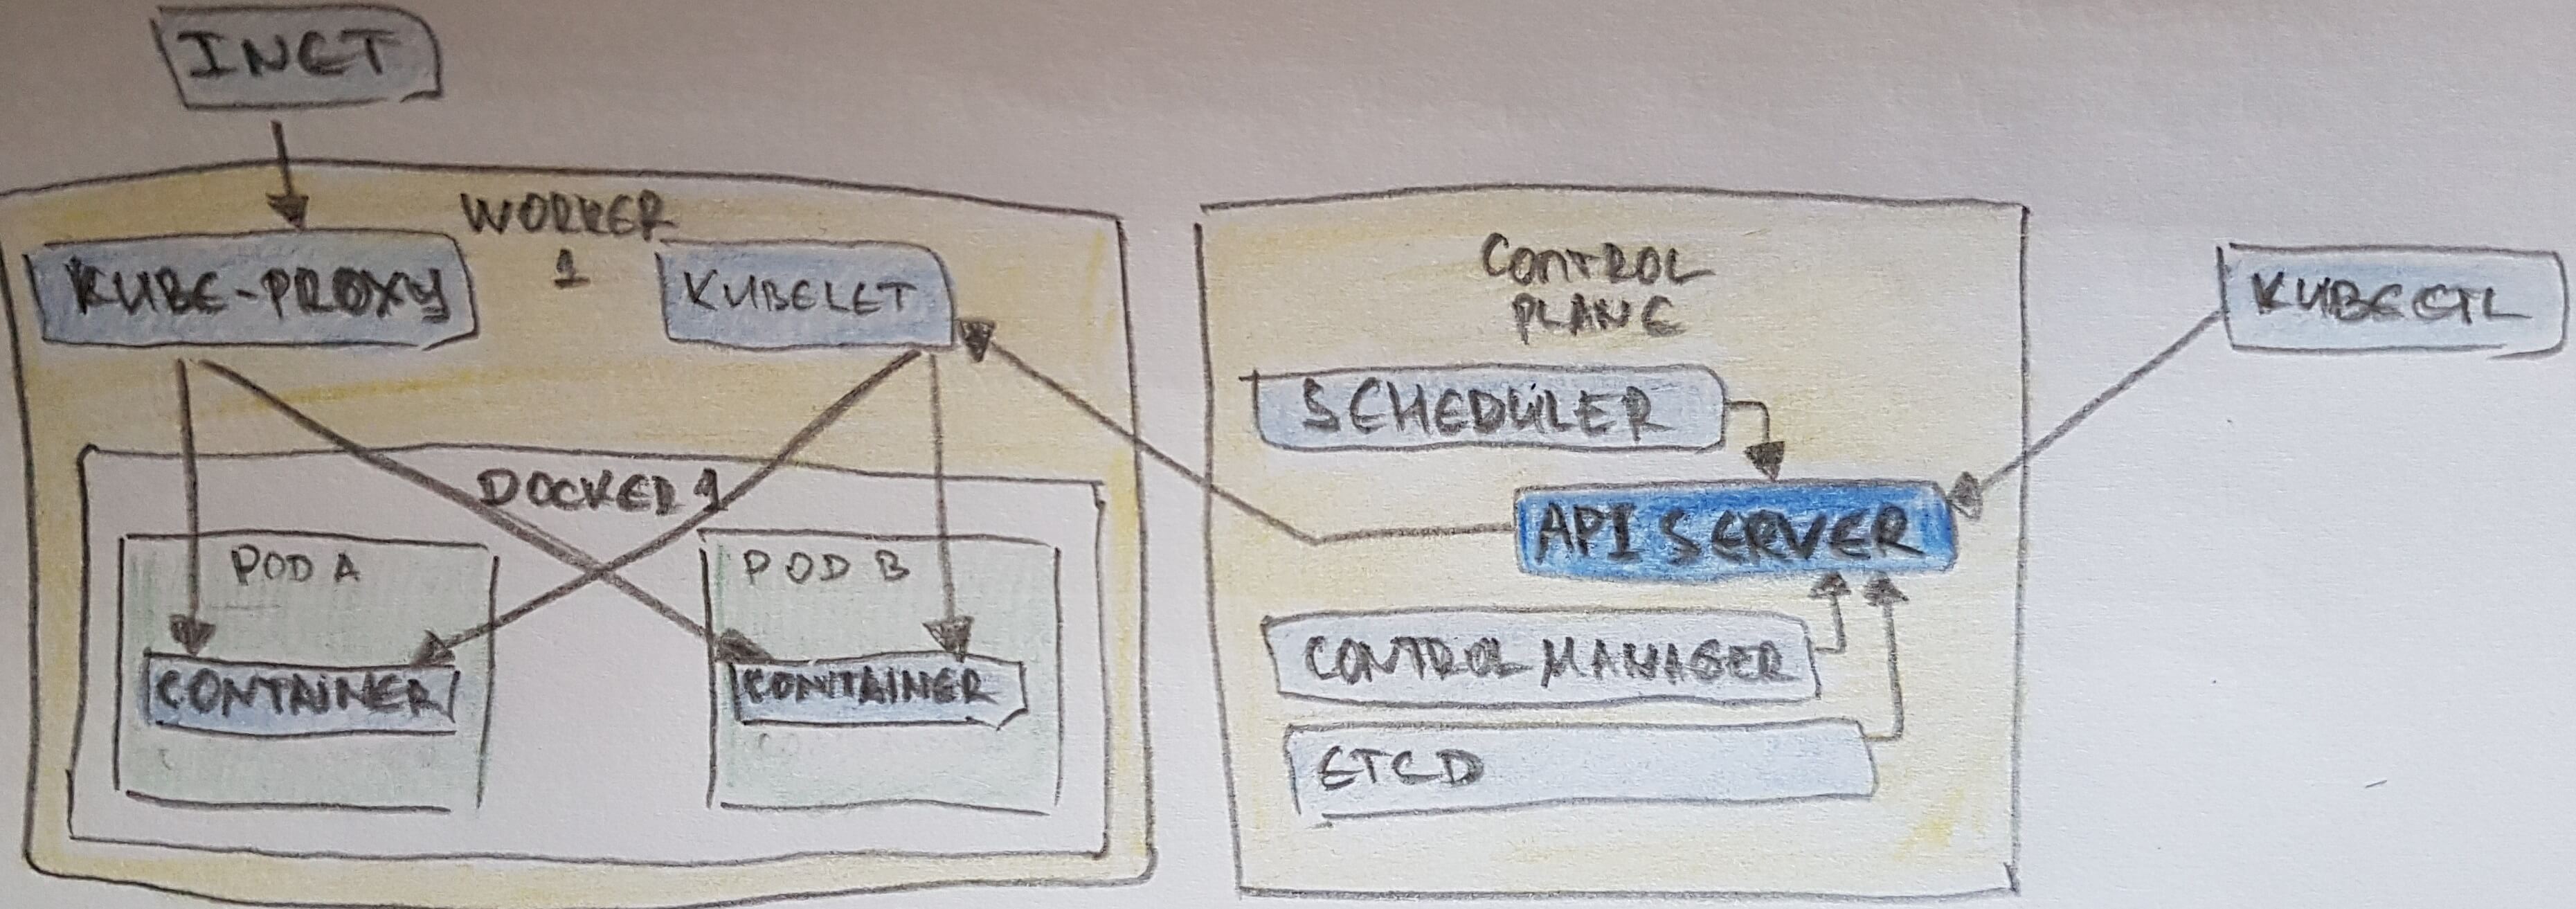
- One or More API Servers: Entry point for REST / kubectl
- etcd: Distributed key/value store
- Controller-manager: Always evaluating current vs desired state
- Scheduler: Schedules pods to worker nodes
- kubelet: Acts as a conduit between the API server and the node
- kube-proxy: Manages IP translation and routing
- (Krochmalski, 2017) kube-proxy knows only UDP and TCP, does not understand HTTP, provides load balancing, and is just used to reach services.
- A Worker Node contains
- Kubelet service to communicate with the Master Node
- Proxy acting as a network proxy and load balancer for a service on the node
- containerD - container runtime, preciously Docker Engine.
- Worker Nodes are accessed thru Load Balancer
- multiple definitions within a single yaml are separated by —
kubectl
- (Burns et al., 2019) kubectl + JSONPath to extract specific fields from objects (pod, daemonSet, deployment). As an example, this command will extract and print the IP address of the pod:
> kubectl get pods my-pod -o jsonpath --template={.status.podIP}
> kubectl apply -f loanamort-pod.yaml
> kubectl run {name} --image={image} --port={number} # where the port is exposed within the cluster, not outside.
> kubectl expose deployment {deployment name} --name={service name} --port{number} --target-port={number} # where --port is where the service should listen, and --target-port is where the traffic should be directed to.
> kubectl delete deployment/{deployment name} # deletes the resource-type/resource-name
> kubectl create -f myConfigFile.yml # and
> kubectl delete -f myConfigFile.yml # where the configuration file (and what is defined inside).
> kubectl proxy # default access URL is: http://localhost:8001/api/v1/proxy/namespaces/default/{resource-type}/{resource-name}
# example: http://localhost:8001/api/v1/proxy/namespaces/default/services/hello-wildfly-service/index.html
> kubectl proxy --address 0.0.0.0 --accept-hosts '.*'
# http://localhost:8001/api/v1/namespaces/kubernetes-dashboard/services/https:kubernetes-dashboard:/proxy/
> kubectl port-forward {pod name} {port}:{port}
# required for some debugging cases either with >docker run ... --cap-add=SYS_PTRACE ...
# or with k8s:
  capabilities:
     add:
     - SYS_PTRACE
- (Burns et al., 2019) Using Port Forwarding Later in the book, we’ll show how to expose a service to the world or other containers using load balancers, but oftentimes you simply want to access a specific Pod, even if it’s not serving traffic on the internet. To achieve this, you can use the port-forwarding support built into the Kubernetes API and command-line tools. When you run:
> kubectl port-forward loanamort 8080:8080a secure tunnel is created from your local machine, through the Kubernetes master, to the instance of the Pod running on one of the worker nodes. As long as the port-forward command is still running, you can access the Pod (in this case the kuard web interface) on http://localhost:8080.
Pod & ReplicaSet & Deployment
- Pod - smallest deployable unit that can be created, scheduled, managed
- created in namespace => containers inside share network namespace (ip and port), volume, networks stack, UTS namespace, and find each other on
localhost.- have the same hostname (UTS namespace),
- and can communicate using native interprocess communication channels over System V IPC or POSIX message queues (IPC namespace).
- ReplicaSet - Maintains the lifecycle and number of POD’s replicas running at one time.
- Deployment - responsible for creating and updating instances of your application. It is a higher level of abstraction; it manages ReplicaSets when doing Pod orchestration, creation, deletion, and updates (Krochmalski, 2017).
- Canary Deployment - this technique can be implemented by creating a new ReplicaSet for the new container version (preferably using a Deployment) with a small replica count that can be used as the Canary instance. At this stage, the Service should direct some of the consumers to the updated Pod instances. Once we are confident that everything with new ReplicaSet works as expected, we scale a new ReplicaSet up, and the old ReplicaSet down to zero. In a way, we are performing a controlled and user-tested incremental rollout (Ibryam & Hub, 2019).
Ingress & Service - a logical collection of PODs, and access policy
- (Krochmalski, 2017) Each service is given its own IP address and port which remains constant for the lifetime of the service. Services have an integrated load-balancer that will distribute network traffic to all Pods. While a Pod’s life can be fragile as they are being spun up or down depending on your application needs, the service is a more constant concept.
ClusterIP,NodePort,LoadBalancer,Headless+Endpoint,ClusterIPwithExternalName
- Another potions is
Ingress(see (Ibryam & Hub, 2019) for more details). - Assuming a client knows the name of the Service it wants to access, it can reach the Service by a fully qualified domain name (FQDN) such as
random-generator.default.svc.cluster.local. Here,random-generatoris the name of the Service,defaultis the name of the namespace,svcindicates it is a Service resource, andcluster.localis the clusterspecific suffix. We can omit the cluster suffix if desired, and the namespace as well when accessing the Service from the same namespace. - Nginx Ingress Configuration
- To use on AWS ALB, install the service as NodePort and add anotations for ALB
Istio Routing & traffic management
- Istio on AWS ALB
- VirtualService: routes traffic to particular services, match by condition (headers, end-user, exact …), weight (a.k.a. canary, A/B, blue-green) (Layer 7)
- DestinationRule: applied after VirtualService, used to configure what happens to the traffic, once arrived at the destination service: load balancing, subnets with versions, etc
- Gateway: control inbound and outbound traffic for the mesh (layers 4-6)
- https://istiobyexample.dev/
Job - creates at most 1+ PODs to ensure N of them complete successfully
- for short running processes
- Nonparallel (a single POD to finish), Parallel (N PODs finishes, or coordination work queue, or external service for terminate condition) and CronJob
Volume - Directory accessible to the containers
- The lifecycle of a volume is tied to the pod that created it. Pods can store data on this volume and preserve data across container restarts. But the volume ceases to exist along with the pod. Moreover, pods are ephemeral and so may be rescheduled on a different host. This means the data cannot be stored on a host as well.
- Types:
- hostPath: A file or directory from the host node’s filesystem
- nfs: Existing Network File System share
- awsElasticBlockStore: An Amazon Web Service EBS volume
- gcePersistentDisk: A Google Compute Engine persistent disk
- secrets
- ConfigMap
- …
PersistentVolume - cluster-scoped storage for applications that require long-lived data.
- Provision
apiVersion: v1
kind: PersistentVolume # the volume
metadata:
  name: couchbase-pv
  labels:
    type: amazonEBS
spec:
  capacity:
    storage: 5Gi # the capacity
  accessModes:
    - ReadWriteOnce
  awsElasticBlockStore:
    volumeID: vol-0e04a9f45ad0cc01d # unique ID
    fsType: ext4
- Request
kind: PersistentVolumeClaim # the claim
apiVersion: v1
metadata:
  name: couchbase-pvc
  labels:
    type: amazonEBS
spec:
  accessModes:
    - ReadWriteOnce
  resources:
    requests:
      storage: 3Gi
- Claim thtough a Pod
# pod.yml
volumes:
 - name: couchbase-volume
 persistentVolumeClaim:
 claimName: couchbase-pvc # the claim match
Auto-Scaling
- The
HorizontalPodAutoscaleris prefered over theVerticalPodAutoscaler. - Scales the numbers of pods in a replication controller, deployment, or replica based on observed CPU utilization.
- By default, the auto-scaler checks every 30 seconds and adjusts the number of replicas to match the observed average CPU utilization to the target specified by the user.
- The auto-scaler uses https://github.com/kubernetes/heapster to collect CPU utilization information, so it must be installed in the cluster for auto-scaling to work.
- Alternatively Service Mesh could be used - e.g. Knative (on top of Istio).
DaemonSet
StatefulSet
- (Ibryam & Hub, 2019) Rather than referring to a predefined PVC, StatefulSets create PVCs by using volume
ClaimTemplateson the fly during Pod creation. This mechanism allows every Pod to get its own dedicated PVC during initial creation as well as during scaling up by changing the replicas count of theStatefulSets.- PVCs are created and associated with the Pods, but … StatefulSets do not manage PVs in any way. The storage for the Pods must be provisioned in advance by an admin, or provisioned on-demand by a PV provisioner based on the requested storage class and ready for consumption by the stateful Pods.
- Note the asymmetric behavior here: scaling up a StatefulSet (increasing the replicas count) creates new Pods and associated PVCs. Moreover, scaling down deletes the Pods, but it does not delete any PVCs (nor PVs), which means the PVs cannot be recycled or deleted, and Kubernetes cannot free the storage. This behavior is by design and driven by the presumption that the storage of stateful applications is critical and that an accidental scale-down should not cause data loss. If you are sure the stateful application has been scaled down on purpose and has replicated/drained the data to other instances, you can delete the PVC manually, which allows subsequent PV recycling.
Helath Probes
- Startup, Readiness, Liveness
Namespace
- (Krochmalski, 2017) A namespace functions as a grouping mechanism inside of Kubernetes. Pods, Volumes, ReplicaSets, and services can easily cooperate within a namespace, but the namespace provides an isolation from the other parts of the cluster
- cross namespace communitcation - DNS is in the form of
<Service Name>.<Namespace Name>.svc.clister.localand it is called with the<Service Name>only. So just add the namespace name to it.- with networkpolicies we can restrict calls from one namespace to another one
Scheduling policies - match a Pod to a Node
- (Ibryam & Hub, 2019) Pods get assigned to nodes with certain capacities based on placement policies… As soon as a Pod is created that is not assigned to a node yet, it gets picked by the scheduler together with all the available nodes and the set of filtering and priority policies. In the first stage, the scheduler applies the filtering policies and removes all nodes that do not qualify based on the Pod’s criteria. In the second stage, the remaining nodes get ordered by weight. In the last stage the Pod gets a node assigned, which is the primary outcome of the scheduling process.
In most cases, it is better to let the scheduler do the Pod-to-node assignment and not micromanage the placement logic. However, on some occasions, you may want to force the assignment of a Pod to a specific node or a group of nodes. This assignment can be done using a node selector..spec.nodeSelectoris Pod field and specifies a map of key-value pairs that must be present as labels on the node for the node to be eligible to run the Pod. - Scheduler Policies - predicates and priorities.
- Node
affinityand Podanti/affinity
# in the pod.xml
spec:
 affinity:
  nodeAffinity: ...
  podAffinity: ...
  podAntiAffinity: ...
- (Ibryam & Hub, 2019) A more advanced feature that controls where Pods can be scheduled and are allowed to run is based on
taintsandtolerations. While node affinity is a property of Pods that allows them to choose nodes,taintsandtolerationsare the opposite. They allow the nodes to control which Pods should or should not be scheduled on them. Ataintis a characteristic of the node, and when it is present, it prevents Pods from scheduling onto the node unless the Pod has toleration for the taint. In that sense,taintsandtolerationscan be considered as an opt-in to allow scheduling on nodes, which by default are not available for scheduling, whereasaffinityrules are an opt-out by explicitly selecting on which nodes to run and thus exclude all the nonselected nodes.- There are hard taints that prevent scheduling on a node
(effect=NoSchedule), soft taints that try to avoid scheduling on a node(effect=PreferNoSchedule), and taints that can evict already running Pods from a node(effect=NoExecute).
- There are hard taints that prevent scheduling on a node
# Taineted Node
apiVersion: v1
kind: Node
metadata:
 name: master
spec:
 taints:
 - effect: NoSchedule # Taint on a node’s spec to mark this node as not available for scheduling except when a Pod tolerates this taint
 key: node-role.kubernetes.io/master

# Pod tolerationg Node taints
apiVersion: v1
kind: Pod
metadata:
 name: random-generator
spec:
 containers:
 - image: k8spatterns/random-generator:1.0
 name: random-generator
 tolerations:
# Tolerate (i.e., consider for scheduling) nodes, which have a taint with key noderole.kubernetes.io/master. On production clusters, this taint is set on the master node to prevent scheduling of Pods on the master. A toleration like this allows this Pod to be installed on the master nevertheless.
 - key: node-role.kubernetes.io/master
# Tolerate only when the taint specifies a NoSchedule effect. This field can be empty here, in which case the toleration applies to every effect.
 operator: Exists
 effect: NoSchedule
fabric8/configmapcontroller (controller script)
- This is a controller that watches ConfigMap objects for changes and performs rolling upgrades of their associated Deployments. It can be used with applications that are not capable of watching the ConfigMap and updating themselves with new configurations dynamically. That is particularly true when a Pod consumes this ConfigMap as environment variables or when your application cannot quickly and reliably update itself on the fly without a restart.
AWS EKS Example
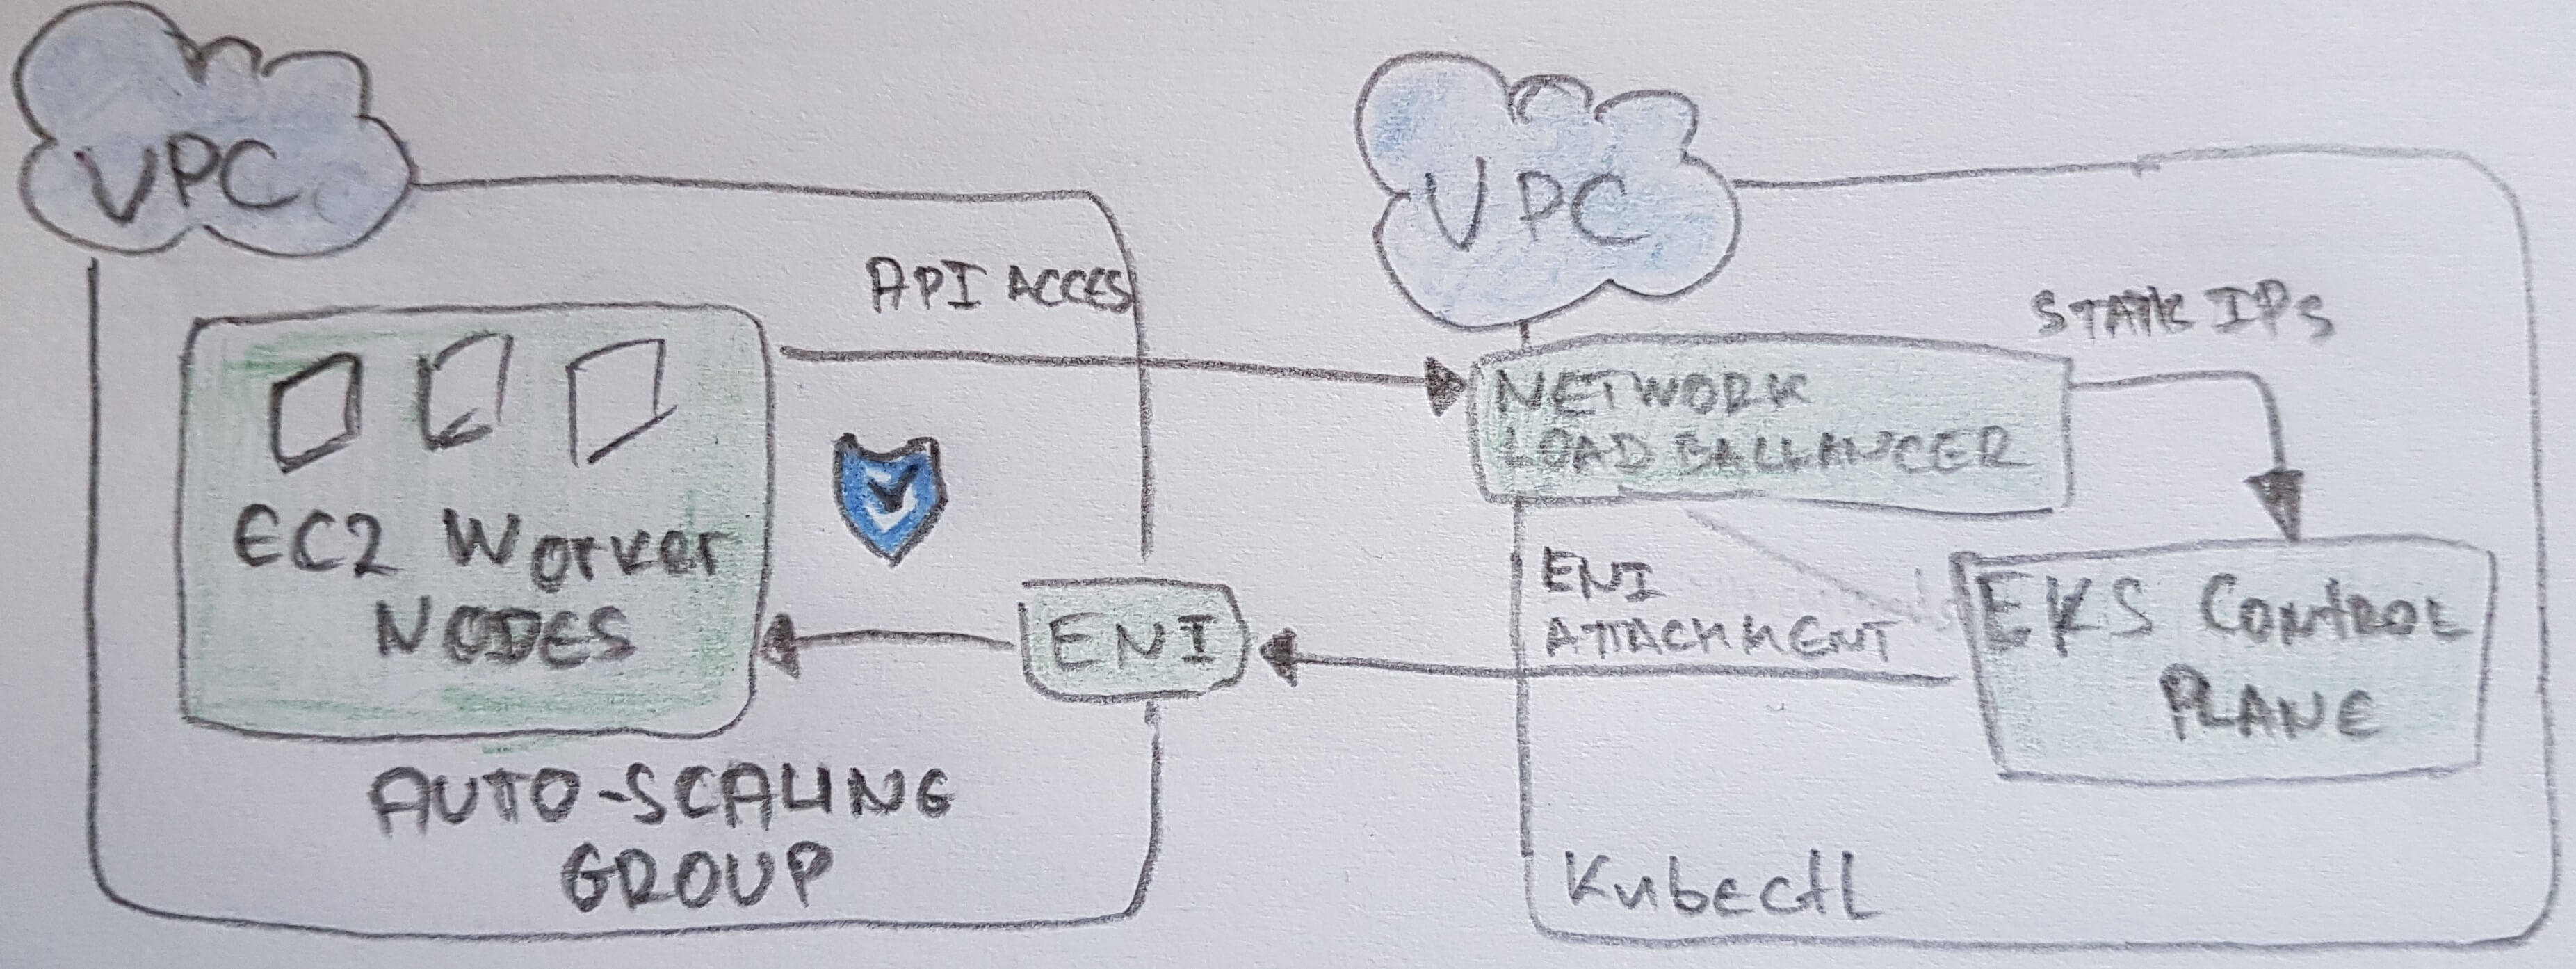
- Install:
- docker
- aws
- kubectl
- aws-iam-authenticatior (just move to folder in the PATH)
- eksctl (just move to folder in the PATH)
- Create IAM Role with AmazonEKSClusterPolicy and AmazonEKSServicePolicy
- Create VPC with new stack https://amazon-eks.s3-us-west-2.amazonaws.com/cloudformation/2019-02-11/amazon-eks-vpc-sample.yaml
- AWS WebUI: Create cluster with IAM and VPC (may take 10+ munites)
- another option is
> eksctl create cluster --name <NAME> --nodes 3 --region <REGION_ID>
, which will also create the modes. - another option is cloudformation stack:
- another option is
## --nodes, --region
Type: AWS::EKS::Cluster
Properties:
  Name: prod
  Version: '1.11'
  RoleArn: arn:aws:iam::012345678910:role/eks-service-role-AWSServiceRoleForAmazonEKS-EXAMPLEBQ4PI
  ResourcesVpcConfig:
    SecurityGroupIds:
    - sg-6979fe18
    SubnetIds:
    - subnet-6782e71e
    - subnet-e7e761ac
- Connect kubectl with cluster
> aws eks update-kubeconfig --name <CLUSTER_NAME> - Create worker nodes with new stack https://amazon-eks.s3-us-west-2.amazonaws.com/cloudformation/2019-02-11/amazon-eks-nodegroup.yaml
- use
- use
which is an output artefact from VPC - use NodeImageId from the table in the main link above
- keyPair - get from Services -> EC2 -> Network & Security -> Key Pairs -> Create Key Pair
- vpcid and subnets from VPC
- use
- Connect nodes to cluster:
ConfigMapobject
> kubectl apply -f aws-auth-cm.yml
> kubectl get nodesshould print the nodes
# https://docs.aws.amazon.com/eks/latest/userguide/add-user-role.html
# k8s aws-auth-cm.yml
apiVersion: v1
kind: ConfigMap
metadata:
  name: aws-auth
  namespace: kube-system
data:
  mapRoles:
    # get it from the stack output for worker nodes creation
    - rolearn: NodeInstanceRole from previous step output
      username: system:node:
      groups:
        - system:bootstrappers
        - system:nodes
- ELB AWS configu ??
> aws iam get-role --role-name "AWSServiceRoleForElasticLoadBalancing" || aws iam create-service-linked-role --aws-service-name "elasticloadbalancing.amazonaws.com"
aws eks example
https://eksworkshop.com
https://github.com/brentley/ecsdemo-nodejs
https://hub.docker.com/r/brentley/ecsdemo-nodejs
https://docs.aws.amazon.com/eks/latest/userguide/getting-started-console.html
https://www.edureka.co/blog/amazon-eks/
https://www.youtube.com/watch?v=6H5sXQoJiso
https://www.oreilly.com/ideas/how-to-manage-docker-containers-in-kubernetes-with-java
https://www.youtube.com/watch?v=8OPkt93WyPA
References
- Burns, B., Hightower, K., & Beda, J. (2019). Kubernetes: up and running.
- Dinesh, S. (2018). Kubernetes Best Practices. https://cloud.google.com/blog/topics/kubernetes-best-practices
- Gupta, A. (2017). Kubernetes for Java developers.
- Ibryam, B., & Hub, R. (2019). Kubernetes Patterns. O’Reilly Media.
- Krochmalski, J. (2017). Docker and Kubernetes for Java Developers. Packt Publishing.